Desk to Table – Furniture Repurpose

Week 3’s project is a thrift story treasure! I found this cute desk at a thift shore in Atlanta, and it came with an even cuter chair! I love the curves and the legs of this desk, but that hideously ugly purple color had to go. I also didn’t really need a desk in my apartment, but I did need a table on the wall behind my couch, and this seemed perfect. All it took was a little loving and a little more paint and this purple desk transformed into a beautiful entryway table.

Before-After 2

Lets get started!

Supplies used for this project:

  • paint – I used Behr Ultra Banana Cream Pie from Home Deopt – 8oz wasn’t enough, but 16oz was plenty
  • brushes
  • sandpaper
  • drawer pulls – Rather than painting the drawer pulls, I replaced them with pretty gold ones from Hobby Lobby
  • antiquing glaze
  • old rags

The first thing I did was sand down the table a little to get some of that ugly purple paint off. Using stripping gel would be easier, but I didn’t want to have to scrape the old paint off. I knew the thick Behr paint would be thick enough to cover the purple, so I wasn’t that concerned about getting all of the purple paint off. Then I started painting! I started on the top first, then moved to the edges, the sides, and the legs. The legs were the hardest to paint because they were skinny and round. After the first coat was dry, I did a second coat on everything but the legs. After the 2nd coat was completely dry, I flipped the desk over and did the second coat on the legs. Once the legs were dry, I flipped the desk back over used the antiquing glaze to give the desk a distressed look. See my previous post on how to distress. Here are a few up close pictures after the distressing. The antiquing glaze really brings out the character in this old desk.

DSC_0128

DSC_0132

Easy enough, right? Top it off with a lamp, a framed quote, and an old window as décor, and this old desk is turned into cute little entryway table!

Desk with Decor2

Distressing Technique

Week 2’s project isn’t a big one, but this technique is something I will refer to a lot in future posts. I am going to show you how I use a glazing technique to give something an old distressed look.

Before and After

Last week, I was cleaning up my craft closet and doing some reorganizing around the apartment, and I came across a small canvas that got messed up during my move. I was about to throw it away when I wondered what the wood frame around the canvas looked like. I got out my toolbox, grabbed a small flathead screwdriver and some pliers, and started prying out the staples that held the canvas to the frame. I was really surprised with how cute the frame actually is! I mean, who knew?! And this beats having to find a frame that you can paint at a thrift store or flea market. I’ll be explaining the glazing technique to the best of my ability, but I learned how to do it from another blog which shows a video of the glazing process for anyone who is interested.

DSC_0049

Here are the supplies needed for this project:

  • Wooden frame
  • Paint of choice and brush
  • Finishing glaze
  • Sandpaper
  • cheap/unimportant washcloth (that can be ruined)

DSC_0058

Step 1: Sanding

Sand down the frame slightly. This should only take about a couple of minutes. You don’t want to make it completely smooth but enough to get some of the paint off if it has been previously painted.

Step 2: Painting

I painted my frame with white before using my color of choice (turquoise). You definitely don’t have to do this, but if you are painting an old frame that already has paint on it, it might be good to paint it white first so the old color doesn’t show through. While my frame wasn’t painted before, I wanted to have a white base color on it so I could spot paint the frame with turquoise to give the frame a “shabby” look. When I say spot paint, I just mean that I didn’t cover the entire frame with the turquoise. I didn’t put a lot of paint on my brush to let some of the white show through the turquoise. Silly me forgot to take a picture of this step. Sorry y’all! But here is a picture of the frame completely covered in white paint.

DSC_0067

Step 3: Glazing

Once the paint on your frame is completely dry, it is time to paint on the glaze. You will want to make sure to get it in every little nook and cranny! Once you’ve painted on the glaze, you will use your old/unimportant washcloth to wipe off the glaze. You’ll notice that not all of the glaze will wipe off. You don’t want it to wipe it completely off. That’s how the frame will get it’s distressed look. In this picture, you can see what the frame looks like with the glaze painted on, and what it will look like when you wipe it off. Notice how some of it stays on the frame? That’s perfect. The glaze will stay in all of the nooks and crannies which is why you don’t want to sand it completely smooth in the beginning, but just enough to calm down any really rough parts.

DSC_0068

And there you go! Now your frame has an old/worn antique-y look!

DSC_0078

DSC_0077

Chevron Drip Canvas

The craft project for Week 1 is a Chevron Drip Canvas. I did one several weeks ago and have received several compliments about it, so I thought I would do a another one and show the step-by-step. This canvas only took me between 3-4 hours to complete, and then I let it dry overnight. This is my first time attempting to explain my process, so if something doesn’t make sense, please let me know! Sorry in advance about the lighting on some of the pictures. I’ll work on that for future posts.

20130816-160107.jpg

Let’s get started!

Supplies you will need for this project:

  • various colors of acrylic paint – make sure it is the paint in the bottle, as shown below. Bottled paint is thinner than the paint that comes in the tube and this is necessary to make the paint drip. I chose red, blue, and grey paint to make my canvas University of West Georgia themed for my office.
  • paint brushes and something to hold the paint – I used a plastic plate covered in tin foil.
  • yard stick or ruler
  • something to cover the floor while you paint – I used an old box, cut and spread apart.
  • a piece of colored chalk – if you use white chalk, you won’t be able to see it on the canvas
  • your canvas of choice – I used a 48″ x 24″ sized canvas

20130816-084225.jpg

Step 1: Make the marks

Use the yard stick and the chalk to measure out the high and low points of the chevron design. I use chalk because you can paint over it and never know it was there. If you mess up with the chalk, it’s no big deal! Just get a damp wash cloth and rub it on the messed up area and the chalk goes away. Pretty cool, huh?!

20130816-084255.jpg

I wanted to do a wide chevron, so I made a mark every 12 inches, giving me 3 lines total on the canvas. If you want more highs and lows in your chevron design, then do shorter measurements. Once you have done that on one end, turn the canvas around and make the marks on the other end. Be sure to mark a little on the top of the canvas so you can see it.

20130815-221130.jpg

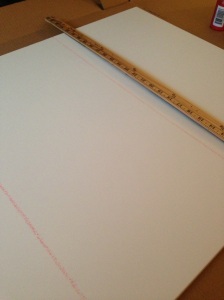
Now use the marks you just made and the yardstick to draw straight lines down the canvas with your chalk. This defines the high and low points of your chevron design.

20130816-084310.jpg

Step 2: Paint the chevron design

Now it’s time to start painting. It is very important to do this with the canvas lying flat. The first time I did this, I started with the canvas tilted up and had some premature drips that made it really difficult to do the second and third coats of paint under the drips.

To make the chevron design, I picked a spot toward the middle on the left side of the canvas (I’m right-handed so I always go left to right) and started painting up toward my first chalk line. You can make the lines as steep as you want and as thick as you want. As you can see, I made some lines thicker than others.

20130816-084322.jpg

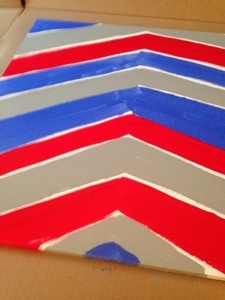
Once you hit the chalk line, it’s time to change directions and head down toward the other chalk line. I did not worry about making sure the highs and lows of the chevron hit at the same point horizontally on the canvas. To me, it didn’t matter where on my vertical lines the points hit, as long as they hit somewhere on the line. With the drip technique, I personally don’t think it matters if the chevron is perfect, but if you do, make sure to use the chalk and the yard stick to create horizontal lines across the canvas to make each high/low for each color hit in the same place on the vertical line.

20130816-091650.jpg

It will take several coats of paint to get a smooth look, so for the first coat, we’re just worried about getting the design on the canvas. Because you’re using different colors, it’s good to leave a very small gap in between each color so that you can continue to paint the colors don’t run and smear into each other. We will fix the gap when we do our second coat.

Also, since I did a random order of colors, I did not paint all the lines of one color before moving on to the next color. I painted my first line in blue, then did a red below and grey above. Then I continued to add one color below and one color above, which is why the small gap in between each line was so important. I didn’t have to wait for each line to dry before I did another color next to it.

20130816-084333.jpg

Don’t forget to paint around the edges as you go! This will be a huge lifesaver at the end.

Let the paint dry a little before filling in the gaps. If you want to speed up the process, use a hairdryer on low on the edges of each line. Once the edges are somewhat dry, you can go over each color again and fill in the gaps. It didn’t matter so much for these colors because they are all dark, but depending on what colors you choose, it is important to remember to go over your light colors first and then your darker colors.

20130816-084354.jpg

I still have a few very small gaps in between my colors but that can be fixed once we do the drips.

20130816-084510.jpg

Here is what my canvas looks like with the finished chevron design. Again, it doesn’t have to be perfect because the drips will be all over the place.

Step 3: Dripping the paint

Now you will need to tilt your canvas up. Don’t set it up straight but make sure it’s at a slight angle. The box I used to cover the ground was pretty large, so I was able to bend the box where the bottom of the canvas hit it to make the box stand up as well. This gave coverage to the back of the canvas against my entertainment center and to the bottom of the canvas against the floor, so I’ve still got my painting area completly covered.

Make sure to get a good amount of paint on the brush. Get a big glob.

20130816-084518.jpg

Put the brush near the edge of the line you are working on and press down to transfer the glob of paint on the brush to the canvas. At times, I had to rotate my brush in a circle while pressing it on the canvas to transfer the paint. You will see the drips starting to form. It’s okay if the drips don’t fall very fast. If you want really long drips, wet your paint brush with water and then squeeze most but not all of the water out before dipping it into the paint or add a few drops of water to the paint before dipping your brush. This will thin the paint a little more. Don’t forget to smooth out the paint above the where you have placed the drips. Use this as an opportunity to do a third coat of paint on each line.

20130816-084549.jpg

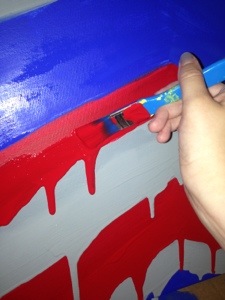
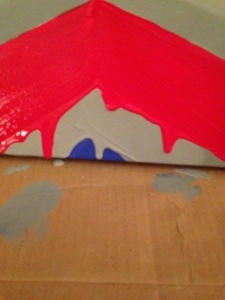
**The most important part of the drip technique is to start from the BOTTOM of the canvas and move up. If you start from the top or the middle, it will be really hard to paint around and under the drips that have formed. Look at the picture below. See how the drip from the red went all the way to the bottom? If I had done the red drips before painting on the grey, it would have been really hard to paint around that red drip and create my grey drips. **

20130816-084532.jpg

The number of drips in your canvas is up to you! You can add as many or as few as you want. For this canvas, I wanted to do a lot of drips since I did a wide chevron design. And because the drip look is so messy, the fact that my chevron design wasn’t perfect doesn’t really matter. Continue the drip process for each chevron line from the bottom up, and VOILA! You have your finished Chevron Drip Canvas! Make sure to keep it on the box until it is completely dry. If you like the look of the drips, go ahead and lay the canvas flat again. If you want it to drip a little more, keep it at an angle but make sure it is tilted to where the bottom edge of the canvas is getting air so it will dry.

20130815-221427.jpg

Looking at both of the drip canvases I have done, you can see the differences. On my first drip canvas (left), I used the same size canvas but used 6″ measurements for my vertical lines because I wanted the chevron design to be more narrow. While I still didn’t make my chevron design look perfect by measuring out horizontal lines, I used fewer drips which made the chevron design more defined.

20130816-152415.jpg 20130816-152453.jpg

20130816-152440.jpg 20130816-152937.jpg

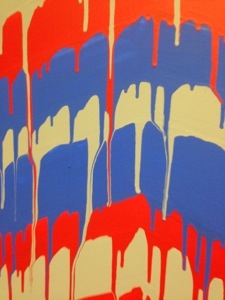
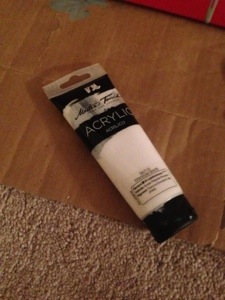
Do you notice how the gold lines don’t have drips? For those lines, I used the paint from the tube which is a lot thicker, and I like having those lines without drips. If you want some lines that don’t drip you can certainly still use the bottled paint and just not do the drip technique, but I like the paint in the tube for metallic colors, so that’s why I chose that type of paint for the gold. Plus, paint in the tube is thicker, so it can help to add dimension to your canvas. Below is a picture of paint in the tube for those of you who may not have any idea of what I’m trying to describe.

20130816-084619.jpg

Now that you’ve seen different variations, you can decide what you want yours to look like! Don’t be afraid to experiment and try new things! That’s how these canvases came about. I didn’t mean to do drips on my first canvas, but it happened so I just went with it! I would love to see pictures of what your canvases look like! Feel free to share at agirlandhercrafts@gmail.com.

Happy crafting!

LK

Here we go…

My life has been hit with a bunch of new changes lately. I graduated from Grad School in May and moved to a whole new area to start my first full-time, professional job in Carrollton, GA at the beginning of July, just to name a few. I feel like I handle change pretty well…well, sort of. There’s always one point during “the transition” where I break down in tears and think my life is over. Those who know me REALLY well have usually experienced an LK meltdown firsthand, either in person or over the phone (by the way, thanks guys!). Whether the meltdown rears her ugly head at the beginning or in the middle of my transition period, I always manage to pull myself together (and save at least a little dignity) when I remember that God has a plan and He is in control. Sometimes it takes me a little longer to get it together, but I’m still here, standing tall and strong, all thanks to Him. While the idea of change has never scared me, the reality of change is not always easy. Some things are easier to deal with than others, but that’s life. You face it, you deal with it, you move on.

In addition to my occasional meltdowns (which will now be referred to as “Diva Days”), I also tend to put a lot of pressure on myself, causing a lot of unnecessary stress. After my freshman year of college, I started painting, and I have my sorority sisters to thank for that. In case you didn’t know, sorority girls loooooooove to craft, and it didn’t take long before I was addicted. Over the years, my crafting and painting styles have evolved, and I even created an shop on Etsy.com to sell some of my canvases. I am licensed to paint and sell Arkansas Razorback canvases and recently got the okay to start selling UWG Wolves canvases (ASU Red Wolves to come next, hopefully). It’s been pretty challenging to adjust to my life as a new professional (and grown-up, for that matter) while maintaining my love for crafts. I never imagined how exhausting a full-time job was! I am struggling to adjust to a 40-hour work week and setting up a regular sleep schedule while finding time to unpack, exercise, and craft. There just aren’t enough hours in the day! I have new respect for people who have full-time jobs AND families–seriously, y’all are the real superheros–and definitely appreciate everything my parents have done for me both now and when I was younger. Thanks Mom and Dad!

I haven’t had a lot of time for painting and crafting lately, and that hurts my heart. This isn’t a hobby that I want to phase out (like my previous balloon animal sculpting skills), so I have to be conscious about making time to craft. While I get my life together and hopefully reduce the number of “Diva Days” I have, I am pledging to do at least one new craft project a week, and to hold myself accountable, I will be posting about it. I have attempted (and failed at) the whole blog thing before, but I know this time will be different because instead of just writing about my feelings or whatever, I will be writing about my love of crafting. I could seriously talk for days about crafting. I hope y’all will help keep me accountable to my goal of one project and post a week, and, of course, I hope you enjoy the Story of a Girl and her Crafts.